A toolbox lid that drops without warning is more than an annoyance. On a ute, trailer or site box, it slows the job down, damages hinges and creates a genuine safety risk. This toolbox lid strut guide is built to help you choose the right replacement or set up a new lid support properly, so the lid lifts cleanly, stays open and closes without a fight.
What a toolbox lid strut actually needs to do
A gas strut on a toolbox is there to control movement, not just hold weight. The right strut should support the lid through its arc, reduce strain on hinges and mounts, and keep the opening action predictable in daily use. That matters even more on heavy checker plate lids, long canopy doors and boxes that are opened repeatedly on site.
The common mistake is to treat the strut as a simple weight match. Lid weight matters, but so do lid length, hinge position, mounting geometry and opening angle. Two lids with the same weight can need very different struts if one is shallow and wide while the other is tall with mounting points set further inboard.
This is why a proper fitment approach saves time. If the force is too low, the lid sags or drops. If it is too high, the lid can spring upward too aggressively, place extra load on brackets and become difficult to shut.
Toolbox lid strut guide: the measurements that matter
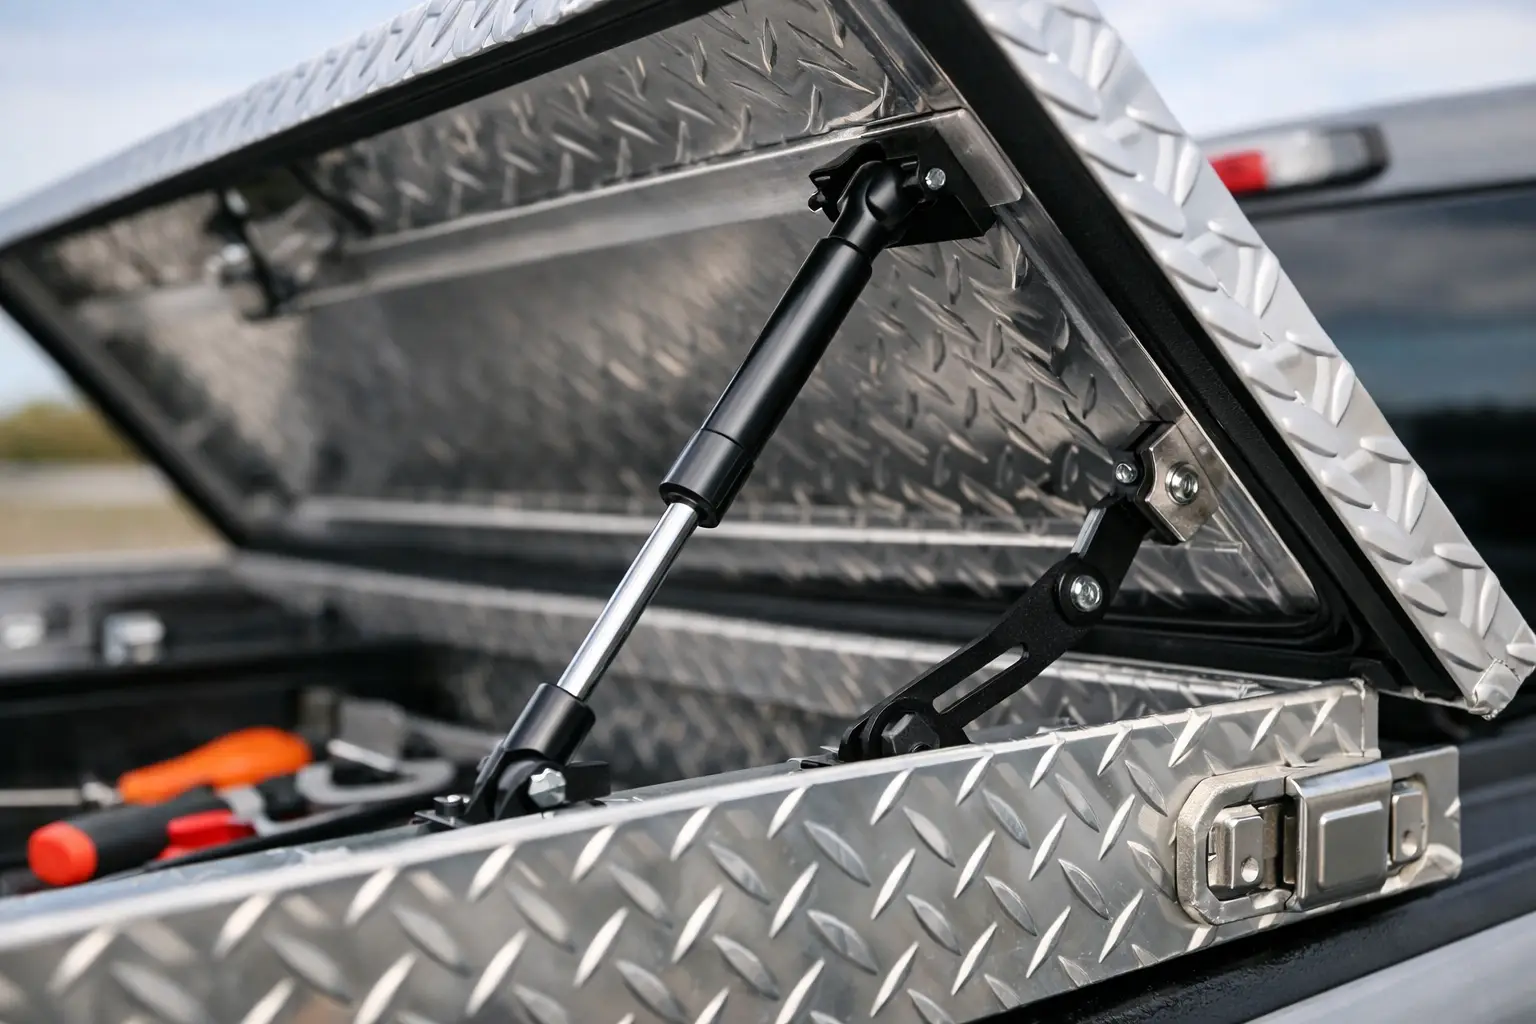
If you are replacing an existing strut, the fastest path is to match the current unit as closely as possible, provided the old setup worked correctly. Start with the extended length from centre of ball joint to centre of ball joint. Then measure the compressed length and work out the stroke, which is the difference between the two.
You also need the force rating, usually shown in Newtons on the body of the strut. If the label is faded or missing, do not guess based on appearance alone. Struts of similar size can have very different force ratings.
End fittings matter as well. Many toolbox applications use ball sockets, but the thread size, ball size and bracket style can vary. A mismatch here turns a simple replacement into a rework job. Check whether the lid side and box side brackets are still sound too. A new strut fitted to bent or cracked brackets will not solve the underlying issue.
For a new installation, there is a bit more to account for. You need the lid dimensions, estimated lid weight, hinge location, required opening angle and where the brackets can be mounted without fouling internal trays, seals or adjacent panels. In practice, mounting geometry determines how much leverage the strut has, so bracket position is a design issue, not an afterthought.
How to measure an existing toolbox strut
Measure with the strut removed if possible. Trying to measure while it is under load often leads to errors. Record the extended length, compressed length, end fitting type, shaft diameter, tube diameter and any part number markings. If the old strut failed gradually, it may have lost pressure over time, so the original force should be verified rather than copied blindly.
If the lid has always been hard to close or never stayed open in wind, that is a sign the existing setup may have been wrong from the start. In that case, matching the old part exactly is not always the best outcome.
Choosing the right force for a toolbox lid
Force selection is where most fitment problems start. The strut must overcome part of the lid weight through the opening range, but not so much that it overpowers the lid. The correct Newton rating depends on leverage. A strut mounted close to the hinge will need more force than one mounted further away because it has less mechanical advantage.
Lid material also changes the result. Aluminium lids are often lighter than steel, but checker plate reinforcement, internal frames, seals, locks and mounted accessories can add more weight than expected. Long gullwing doors and full-width canopy lids may need a paired strut setup to spread the load and avoid twisting.
Temperature can also influence gas strut behaviour. In hotter conditions, struts can feel stronger. In cooler conditions, they can feel softer. For general toolbox use, this does not usually require a dramatic force change, but it is worth allowing for if the box is exposed to wide operating conditions or used in remote work environments.
One strut or two?
Small and lighter lids can sometimes run well on a single strut, especially where the lid is narrow and the mounting geometry is stable. Larger lids usually benefit from two struts. That keeps loading more even across the lid, reduces flex and helps avoid one-sided stress on hinges.
There is a trade-off, though. Two struts mean more balanced support, but they also require bracket alignment to be right on both sides. If one side is slightly out, the lid can bind or rack during movement. On wide lids, careful mounting is worth the effort because the payoff is better durability and smoother operation over time.
Common toolbox strut problems and what causes them
A lid that will not stay open does not always mean the strut itself is wrong. Worn hinges, distorted lids, seized pivots and poor bracket placement can all mimic a weak strut. Likewise, a lid that is hard to close may be over-strutted, but it can also be caused by mounts positioned so the strut reaches the wrong angle too early in the closing arc.
Another common issue is replacing only one strut in a paired setup. If one old strut has failed, the other is usually not far behind. Mixing a fresh strut with a tired one often leads to uneven operation and premature wear. In most paired applications, replacing both at the same time is the better option.
Corrosion matters too, especially on toolboxes exposed to weather, washdown or coastal conditions. Surface wear on the shaft can damage seals, shorten service life and lead to loss of pressure. If the environment is harsh, material quality and sealing performance deserve as much attention as force rating.
Installing a toolbox lid strut properly
Good installation starts with bracket location. The lid should open to the required angle without the strut bottoming out at full extension or reaching hard compression before the lid is fully shut. Either condition can damage the strut or the mounting points.
As a general rule, fitment should allow the strut to provide controlled assistance through the middle and upper part of the opening arc, while still allowing the lid to latch cleanly. The rod is typically mounted facing downward in the closed position where practical, as that helps keep the internal seal lubricated. That said, installation space and bracket geometry sometimes dictate other arrangements.
Check clearance with handles, weather seals, shelves and anything stored inside the box. A setup that works on the bench can still foul once the lid is cycled through its full travel. Before final tightening, test the lid several times and watch for twist, over-centre action or bracket flex.
When custom sizing makes more sense
Standard replacement sizes cover a lot of toolbox applications, but not all of them. Custom can be the right move where the lid is unusually heavy, the opening angle is limited, the box is a one-off fabrication or the available bracket locations are constrained by internal fitout.
This is especially common with site boxes, service bodies, canopies, trailer boxes and fabricated aluminium storage units. In those cases, a standard strut may be close, but not close enough to deliver safe and repeatable operation. A custom solution matched to actual dimensions and force requirements usually avoids repeat ordering and bracket modifications later.
What to have ready before you ask for a replacement
The more accurate the information, the faster the fitment process. For most toolbox applications, have the extended and compressed lengths, end fitting details, current force rating if known, lid dimensions, lid material and whether the setup uses one strut or two. Photos of the open and closed positions are often useful as well, especially if the original part number is unreadable or the installation looks non-standard.
If it is a new build, include the lid width and height, estimated weight, hinge location, desired opening angle and any restrictions around mounting. A specialist supplier can usually work from that information far more effectively than from a rough description like “toolbox on a trailer”.
For buyers who need dependable fitment rather than trial and error, this is where specialist advice pays off. Gas Struts works with standard replacements and application-specific setups across vehicle, industrial and trade use, which is often the difference between getting a strut that fits and getting one that actually works.
A practical approach that saves time
The best result usually comes from slowing down for ten minutes with a tape measure before ordering. Match the dimensions, confirm the mounting style, be honest about lid weight and look closely at the brackets and hinges while you are there. A toolbox strut is a simple part, but only when the sizing and geometry are right.
If you are replacing a failed unit, treat the lid as a system rather than a single component. That approach tends to produce a lid that opens cleanly, stays put and keeps doing its job long after the rush repair would have failed again.